Canon EOS R, a mirrorless digital cameras with interchangeable lenses, is an excellent choice. It features a 30.3-megapixel full frame mirrorless camera. This camera was released in October 2018. It has many amazing features. Here we will take a closer look at the Canon R body and its features. The Customizable Multifunction Bar will be also examined. We'll also discuss whether it can defeat the Sony a7 III.
Review of Canon EOS R mirrorless Digital Camera
Canon EOS R, a 30.3-megapixel full frame mirrorless interchangeable lenses camera that was introduced by the company last Oct. This camera is an excellent choice for beginners because of its many useful features and outstanding picture quality. Learn more about this camera. Also, read our Canon EOS R review. We have five top reasons to buy this camera:
The large lens barrel of the Canon EOS R mirrorless digital camera gives the user plenty of options when it comes to shooting wide-angle shots. It also provides impressive handling. This camera is compatible with select EF lenses. The EOS R also has a focus area that can be adjusted horizontally or vertically depending on the lens. You can customize the ring according to your preferences. The camera also features a click mechanism that indicates when you make a setting change. This feature can be removed for an additional fee by Canon service providers.
Review of the 24-105mm focal length f/4-7.1 zoom lens
A quick internet search brought up a few reviews and comparisons for the Canon RF-24105mm f/4–7.1 IS ST Standard Zoom Lens. This lens is made for Canon EOS R cameras. Other features include a variable aperture, a compact design and an impressive macro mode that allows for a maximum magnification up to 1:2. It also features optical image stabilisation (OIS), which reduces camera shake to produce crisp, clear images.
The RF-24105mm f/4-7 IS STM lens is wide-open and can produce noticeable distortion in some photos. Its f/8 minimum aperture at 24mm results in a moderate amount of vignetting and distortion when compared to its competitors in the EF mount. However, a f/4-7.1 zoom lens on a Canon R body will be ideal for most photographers, allowing you to capture everything from landscapes to street scenes.
Review of the Customizable Multi-Function Bar
Canon EOS R cameras come with the CustomizableMultifuntion Bar. This is an improved scrolling mechanism located on the right-hand side of the EVF. The Multi Function Bar has three customizable controls. It includes a slider as well as two arrows and a mode dial. Each of these can be programmed to perform a different function. Canon has made it easy to use the camera so that you do not have to worry about your fingers getting caught in the controls.
The Multi-function bar of a Canon R Body makes it easy and quick to access your camera settings. The Multi-Function Bar icon, located on the fourth Custom Functions Menu screen, makes it easy for you to access the menu. Simply tap or press the SET button to expand the list of available options. You can then set the Multi-Function Bar to perform the actions that you want to perform.
Review of the Sony a7 III outperforms the Canon EOS R
When it comes to body specifications, the Sony A7 III wins. This DSLR offers more features, including video capture and improved battery life. Additionally, the camera is easier to use than Canon EOS R's auto-exposure bracketing feature and built-in digital zoom. With 600 shots on a single charge, the Sony camera is clear favourite in terms of battery life.
Canon EOS R is an excellent all-round camera that offers decent full-frame resolution, quiet shooting and good continuous shooting for sports. However, the Canon EOS R fails to excel in video. Canon EOS RP is a more popular choice for serious Canon videographers. Here's why. It's not as simple as the Sony a7 III outperforms the Canon EOS R body in video performance.
FAQ
Where can I buy cameras?
There are lots of places online where you can buy cameras. B&H Photo Video, however, is recommended as a trustworthy retailer. They are able to assist you with any questions.
B&H ships fast and securely so it is easy to have your order delivered at your doorstep.
This video will help you learn more about buying cameras.
What equipment is required to start digital photography?
When you start out in digital photography, the first thing to consider is which type of camera you will use. There are many options: DSLRs (digital Single Lens Reflex Cameras), point-and–shoot compact cameras or camcorders. Each model has its own unique features and advantages. DSLR cameras can produce high-quality images, but they are usually heavier and more bulky than other types. Point-and-shoot cameras tend to be smaller and lighter, and may have automatic settings for specific situations. Camcorders are capable of recording excellent video quality and can also be used to take still photos. Smartphones are light and portable and can be carried around easily.
Once you've chosen the type of camera that you want, you can decide whether to purchase a used or new model. Cameras that have been used in recent years can often be found for a reasonable price. Newer models cost more, as manufacturers spend a lot of money on developing new technology.
Next, you will need to purchase lenses. Lenses play a key role in determining the quality of your photographs. You can adjust the focal length of the lens to allow you to zoom in on the scene without losing focus. Some lenses come with built-in flash units while others need external flash units. There is a wide selection of lenses available from different brands. Each lens has its own characteristics.
Finally, you need to purchase memory cards. Memory cards store photos taken by your camera. Your card's size will determine how many pictures it can store. You will need multiple memory card if you plan on taking many photos.
How can I improve my smartphone's photography skills?
You don't need expensive equipment to take great photos! Amazing images are possible with just a smartphone.
Just need to learn the basics of how to use it all.
There are many apps that both Android and iOS users can use to edit and share their photos.
If you want to start taking better photos, here are five tips to help you get started.
-
Set Up Your Camera App. The camera app should be pre-installed on the device. Download it from Google Play, Apple's App Store or Google Play.
-
Use Filters & Effects. Effects and filters allow you to alter the appearance of your photos without needing to touch them.
-
Adjust the Exposure. You can adjust exposure to alter the brightness of your image.
-
Use the Right Lighting Photographing in bright lighting makes it easier for you to see details within your subject. You can capture highlights and shadows in low-light conditions.
-
Photograph People. Photographing people can show others what you are most passionate about.
For more information on how to take better photos, read our article: 5 Tips to Improve Your Photography Skills With A Smartphone
How can I look good on pictures?
You can look great in photos if you take them yourself. You'll learn how to pose for the camera, what angles are flattering, and which ones aren't. Learn how to use lighting, props and other tools to enhance your natural beauty.
This course will teach you how to choose clothing that fits well, make-up that looks great, and hairstyles that flatter your face shape.
If you're unhappy with the result, we'll show how to retouch your images in Photoshop and other editing programs.
You can now take self-portraits.
Statistics
- While I cannot prove that all of those spots were not sensor dust, the photo was taken during a heavy snowstorm…so I guess that 99.8% of the spots are snowflakes. (bhphotovideo.com)
- Get 40% off Adobe Creative Cloud(opens in new tab) (creativebloq.com)
- There are people out there who will pick at flaws they can only see in 100% crops of your photos. (wikihow.com)
- By March 2014, about 3 million were purchased monthly, about 30 percent of the peak sales total. (en.wikipedia.org)
External Links
How To
How to take photos in low light conditions
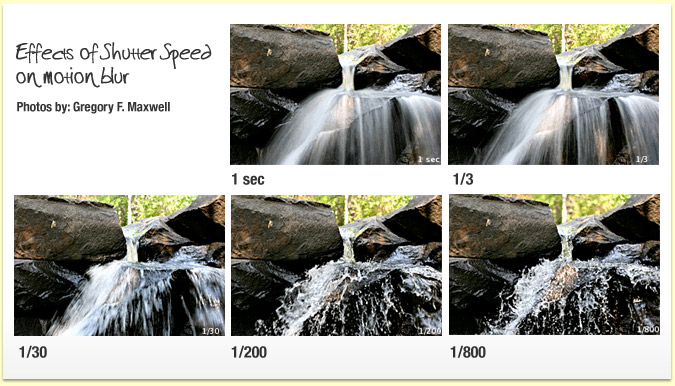
Low-light photography is the art of taking photographs in dark or dimly lit environments. This requires special equipment and techniques. The main challenges in this field include controlling exposure, whitebalance, and sharpness. Two types of low-light photography exist: ambient or flash. Flash photography works best when there's enough light around. If there isn’t enough natural lighting, you will need to use a flash. If your subject is outdoors but indoors, you might not have enough light to take a great picture without a flash. If you don't want to use a flash, try shooting at night during the moonlit hours. This will give you some beautiful shadows and colors. Another option to consider is shooting during twilight. Twilight happens when the sun has set but there is still daylight.
Long exposures are also an option. You can record images even after the shutter is closed for several minutes. The camera records only light that falls on it if the shutter is not closed. During a long exposure, this light continues to fall onto the photo sensor. But, the shutter remains closed and no new light enters. You will see very little movement as a result. To ensure clear images, disable any autofocus and exposure settings. Also, make sure that you adjust the ISO setting before you start shooting. An ISO setting of 200 allows you to adjust how bright or dark the image looks. Finally, when you're ready to take the shot, press the shutter button quickly. This will bring the shutter completely to a close. You should then hold down the shutter button for as long as possible. The shutter button should be held down to prevent more light from entering the camera. After you've taken the picture, wait a few seconds before releasing the shutter button. This allows your camera to process the picture. While you wait, your photos will be displayed on your computer's screen. Once you're satisfied with them, save them to your computer.